LED Ring NeoPixel: Difference between revisions
Jump to navigation
Jump to search
| (8 intermediate revisions by the same user not shown) | |||
| Line 1: | Line 1: | ||
= Description = | = Description = | ||
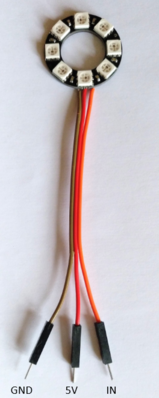
The NeoPixel ring has 3 connections: GND, +/VCC, and the signal. The signal is connected to an output pin and given as parameter (in the example pin 0). The chip to decode the protocol - built into the NeoPixel ring - is WS2812. They are also available in different sizes (more or less LEDs) and different shapes (e.g. band). You have to provide the total number of LEDs as parameter. | The NeoPixel ring has 3 connections: GND, +/VCC, and the signal/IN. The signal is connected to an output pin and given as parameter (in the example pin 0). The chip to decode the protocol - built into the NeoPixel ring - is WS2812. They are also available in different sizes (more or less LEDs) and different shapes (e.g. band). You have to provide the total number of LEDs as parameter. | ||
If you need more than one ring (or other arrangements), you can put them in a row - basically connecting the next ring to the first one (you have to solder it on). | If you need more than one ring (or other arrangements), you can put them in a row - basically connecting the next ring to the first one (you have to solder it on). | ||
| Line 8: | Line 8: | ||
= How to connect it electrically = | = How to connect it electrically = | ||
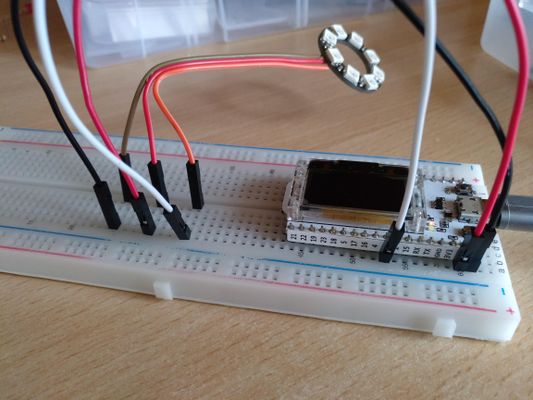
You can "chain" them. If you only have one ring, just connect GND, VCC, and In. | |||
[[File:Neopixel3.PNG|400px]] | |||
[[File:LedRing.PNG|x400px]] | |||
[[File:RingSetup.jpg|x400px]] | |||
= How to control it in MicroPython = | = How to control it in MicroPython = | ||
| Line 82: | Line 85: | ||
</syntaxhighlight> | </syntaxhighlight> | ||
= Related Tutorial Videos = | = Related Tutorial Videos = | ||
Revision as of 17:27, 23 March 2022
Description
The NeoPixel ring has 3 connections: GND, +/VCC, and the signal/IN. The signal is connected to an output pin and given as parameter (in the example pin 0). The chip to decode the protocol - built into the NeoPixel ring - is WS2812. They are also available in different sizes (more or less LEDs) and different shapes (e.g. band). You have to provide the total number of LEDs as parameter.
If you need more than one ring (or other arrangements), you can put them in a row - basically connecting the next ring to the first one (you have to solder it on).
How to connect it electrically
You can "chain" them. If you only have one ring, just connect GND, VCC, and In.
How to control it in MicroPython
import neopixel
from machine import Pin

# number of leds
n=8
# connected Pin
p=0

np = neopixel.NeoPixel(Pin(p),n)

# sets color of the led at position 0 to (r,g,b)
np[0] = (255,0,0)
# colors the leds
np.write()
A small Program in MicroPython
import neopixel
from machine import Pin
from time import sleep

# number of leds
n=8
# connected Pin
p=0

np = neopixel.NeoPixel(Pin(p),n)

# colors the led at position in (r,g,b)
def color(position, r,g,b):
  np[position]=(r,g,b)
  np.write()

# remove all colors
def clearAll():
  for i in range(n):
    color(i,0,0,0)

# remove color from led at position
def clear(position):
  color(position,0,0,0)


# the color (r,g,b) should run x times like a cycle
def cycle(r,g,b,wait,x):
  # before setting new colors, clear the ring
  clearAll()

  # the cycle should run x times
  for j in range(x):
    for i in range(n):
      # clear the previous led
      if(i==0):
        clear(n-1)
      else:
        clear(i-1)

      # color the current led
      color(i,r,g,b)

      # wait, color is displayed this time
      sleep(wait)


cycle(0,255,255,0.5,4)
Related Tutorial Videos
change to the right video
Background
text
image(s)

