Team7 - Seeeduino XIAO
Seeeduino XIAO
The Seeeduino XIAO is a microcontroller with an AT-SAMD21G18-A microcontroller unit (MCU). The microcontroller contains an ARM Cortex CPU which allows operating on low power. It further has a 32-Bit single core processor with a 48Hz clock frequency. Its small size makes it optimal for using as MCU in compact wearable devices. The low power mode is ideal for integrating standby-mode in your DIY project and its rich specifications provide great capability for computational tasks. The variety in interface communication allows integrating different hardware components for adding various features to your project. However when aiming for network-oriented DIY projects the Seeeduino XIAO lacks WiFi connectivity.
The Seeeduino XIAO is compatible with C/C++ or Circuit-Python and Arduino IDE (when using C) or Visual Studio Code (when using Python).
Specifications
- Storage: 256KB Flash, 32KB SRAM
- Interface: I2C, SPI, UART, QTouch
- Input/Output PINs: 14 GPIO PINs, 11 digital/analog PINs, 10 PWM Pins (A1/D1 - A10/D10), 1 DAC output (A0/D0), 1 SWD pad interface
- Dimension: 20x17.5x3.5mm
- Power: 3.3V/5V DC
- Connection: USB Type-C
Detailed pin layout
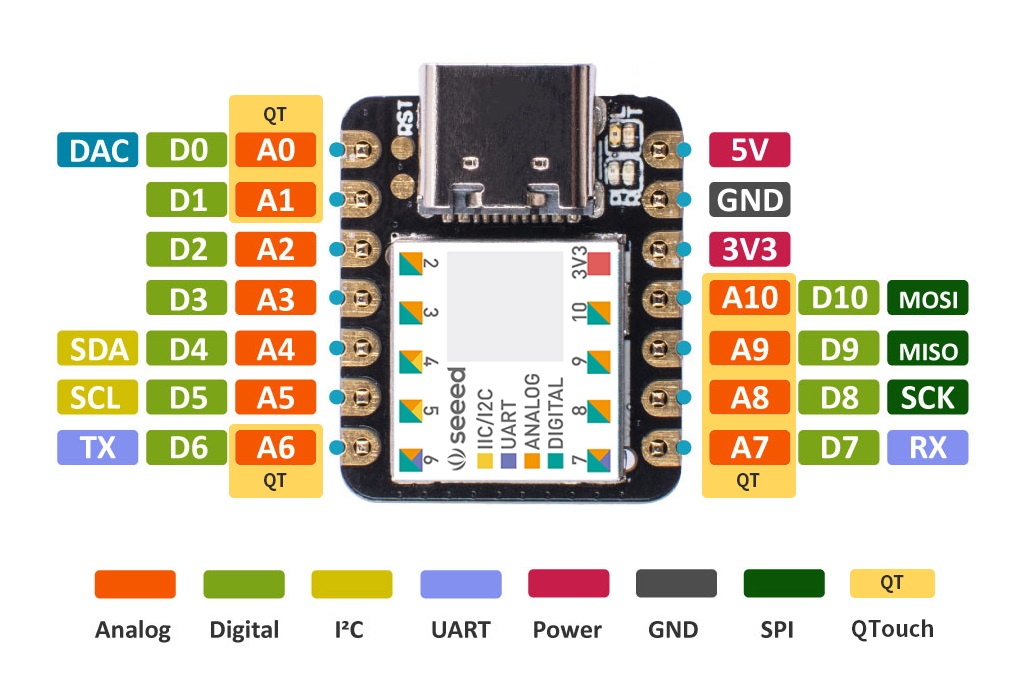
Setup with Circuit-Python
Required hardware: USB Type-C, Male-to-Male (M2M) Jumper, Seeedunio XIAO
Installing Circuit-Python
- Download the Circuit-Python bootloader for the Seeeduino
- Plug-in your Seeeduino to your PC/laptop
- Enter the firmware bootloader by using the M2M jumper.
- Hold one end of the jumper to one of the RST PINs
- Quickly connect the other end of the jumper twice to the remaining empty RST PIN
- A new external drive should appear on your PC/laptop call Arduino
- Drag the downloaded file from step 1 to the Arduino drive
- Once the file has been successfully copied to the drive, unplug the Seeeduino
- Reconnect the Seeeduino and a new external drive CIRCUITPY should appear
- Congrats you have successfully installed Circuit-Python on your device
- To run a python programm simply name your main python programm-file code.py and drag it onto the CIRCUITPY
Setup Tutorial
This video follows the steps mentioned above one-by-one, in case you had trouble understanding the process.
Code Example
This code example was shown as demonstration in the tutorial video above. This simple code lets the installed LED on your Seeeduino blink.
import time
import board
from digitalio import DigitalInOut, Direction

led = DigitalInOut(board.LED_INVERTED)
led.direction = Direction.OUTPUT

while True:
    led.value = True
    time.sleep(1)
    led.value = False
    time.sleep(1)